At some point during the past five months of development work on my synthesiser, I was lucky to chance on Eddy Bergman's blog. Eddy has built an impressive website which details the development of his own modular synthesiser.
Eddy writes in an accessible, practical style and has helped and inspired newcomers to enter the world of "Synth DIY" (or Homebrew, as we would say in the world of radio). Eddy is no stranger to radio, as his blog - like mine - started in the world of RF, back in the teens, with a post on an FM TX and a handy-talkie. Having said that, I can find no evidence of Eddy (who's in The Netherlands) holding a ham license.
There are, of course, lots of significant links between licensed radio amateurs and the world of electronic synthesisers - most notably, the case of one R A Moog, k2amh.
The greatest feature of Eddy's blog is the presentation of validated stripboard layouts for each of the designs featured in the posts. This collection of stripboard-based designs is a rare (or, perhaps, unique) resource in the world of synth DIY and makes a very easy entry point for people wanting to start building.
Readers with as much grey hair as me will know I like stripboard. I have even used it in RF applications, where inter-strip capacitance (etc) makes it a dubious choice, basing my modular BITX on stripboard modules and even using these as the platform for my Parallel IF rig.
I still like stripboard - but other aspects of synth project builds are tempting me away from its use.
Back in 2017, I used the schematic on Yves Usson's "YuSynth" site to build an instance of Dr Moog's iconic voltage controlled filter - what Yves describes as the "must-have" filter. Yves is a Biologist by profession and the creative genius behind the Arturia 'Brute' analog synthesisers. And I checked by asking him; no - he never was a radio amateur!
Yves website describes modules for his own synthesiser, which was developed in the "Moog Unit", "MU" or "5U" standard (think Keith Emerson), which uses 1/4 inch jack sockets, runs on +/- 15V power supply and is physically much bigger than the much more popular Eurorack standard (which is only 3U tall and uses tiny 1/8 inch jacks). However, Yves' modules are adaptable for Eurorack and he gives specific details of circuit changes required to operate on the +/-12V supply used in Eurorack. There are PCB designs on the YuSynth site, but these PCBs do not 'host' the controls or connectors; 5U expects wires from the PCB to front panel components and a bracket to mount the PCB on the front panel.
Here are some images (from September 2017) of the stripboard layout, the populated board, the bracket, and the front panel for my Eurorack build of the Moog filter.
Everything at this stage is nice and tidy - but look at the mess of wires that results when you connect up the controls and connectors on the front panel to the board to finish the module:
Actually, this one is pretty 'clean', because there are only four sockets and three potentiometers - imagine what it would have been like if my
4:1 mux (with 12 sockets, 5 potentiometers, 9 switches and 4 LEDs) had been assembled using this method.
I'm getting old and I figure I've earned the right to say (to myself, at least) when I don't like things.
Truth is, I don't like wiring up front panels. It is soul-destroying, labour-intensive and boring. If you have poor eyesight and an intention tremor (like me) it is difficult. Worst of all, it becomes the weakest link in the module - the place where the faults are most likely to emerge. So - I've decided to stop doing it. You saw the outcomes in the
multiplexer , which even went so far into the 21st century as to use surface mount components (!) Let me show you some more conventional modules, made using good, old-school through-hole components.
In both cases, it was the writing and enthusiasm of Eddy Bergman which inspired - at least in part - my decision to build the new modules.
The first calls again on the work of Yves Usson at YuSynth, who has published a design for an envelope generator, based upon a 7555 - the CMOS version of the once omnipresent 555 timer. This idea - as Yves generously acknowledges - can be traced back to a suggestion by Jonathan Jacky in 1980 which has been developed by others. But Yves has produced a schematic for a great implementation, which is
published on his site, including a PCB layout.
Most importantly, Eddy made the comment:
"I can say without any doubt that this design is perfect if you want a good and reliable ADSR to pair with your VCA or to drive a filter. "
That was enough for me - when I decided back in December 22 that I was going to build a new envelope generator, this was the one I was going to build. But there was going to be a twist...
The YuSynth 7555 envelope generator is an "
ADSR" design, which means that it offers independent control over the
Attack,
Decay,
Sustain and
Release phases of the envelope. I previously have described in these pages an ADSR envelope generator which was (childishly) called the
ADSRduino. That design offered a 'looping' feature, whereby the envelope generator can optionally re-trigger itself to produce a pulse train. I decided that my Eurorack implementation of the YuSynth 755 ADSR envelope generator would also include the additional feature of looping, so I set about modifying Yves' design to provide this.
Here's the schematic, to explain what I did:
Here's the new module from front, back and side:
Note the complete absence of any wiring - lovely to my failing eyes and unsteady hands! This is the way 'real' (i.e. commercial) Eurorack modules are made - for good reason.
Note also the adorable little illuminated push button used as both manual gate switch and gate indicator (seen only as a white circle in the picture above, left). It is the Thonk
Low-Profile LED Button, which I used on the
multiplexer and for which I posted an Eagle library
here.
Needless to say (I hope) the ADSR module - including the looping addition - works perfectly. The new build format, with PCBs and panels from
JLCPCB (usual disclaimer) has allowed me easily to build 3 units, which now see service in the m0xpd synth; duplication is a great benefit of this approach over stripboard and panel wiring!
I should say that there are also links to files for a Eurorack PCB version of the YuSynth 7555 envelope generator on Eddy's site. Whilst these are great, the PCB does not house the controls / connectors etc (like the PCBs on YuSynth, intended for 5U) and so does nothing to eliminate the wiring task from the build. I do not wish to appear to diminish the importance and value of these files, but they do not meet my need.
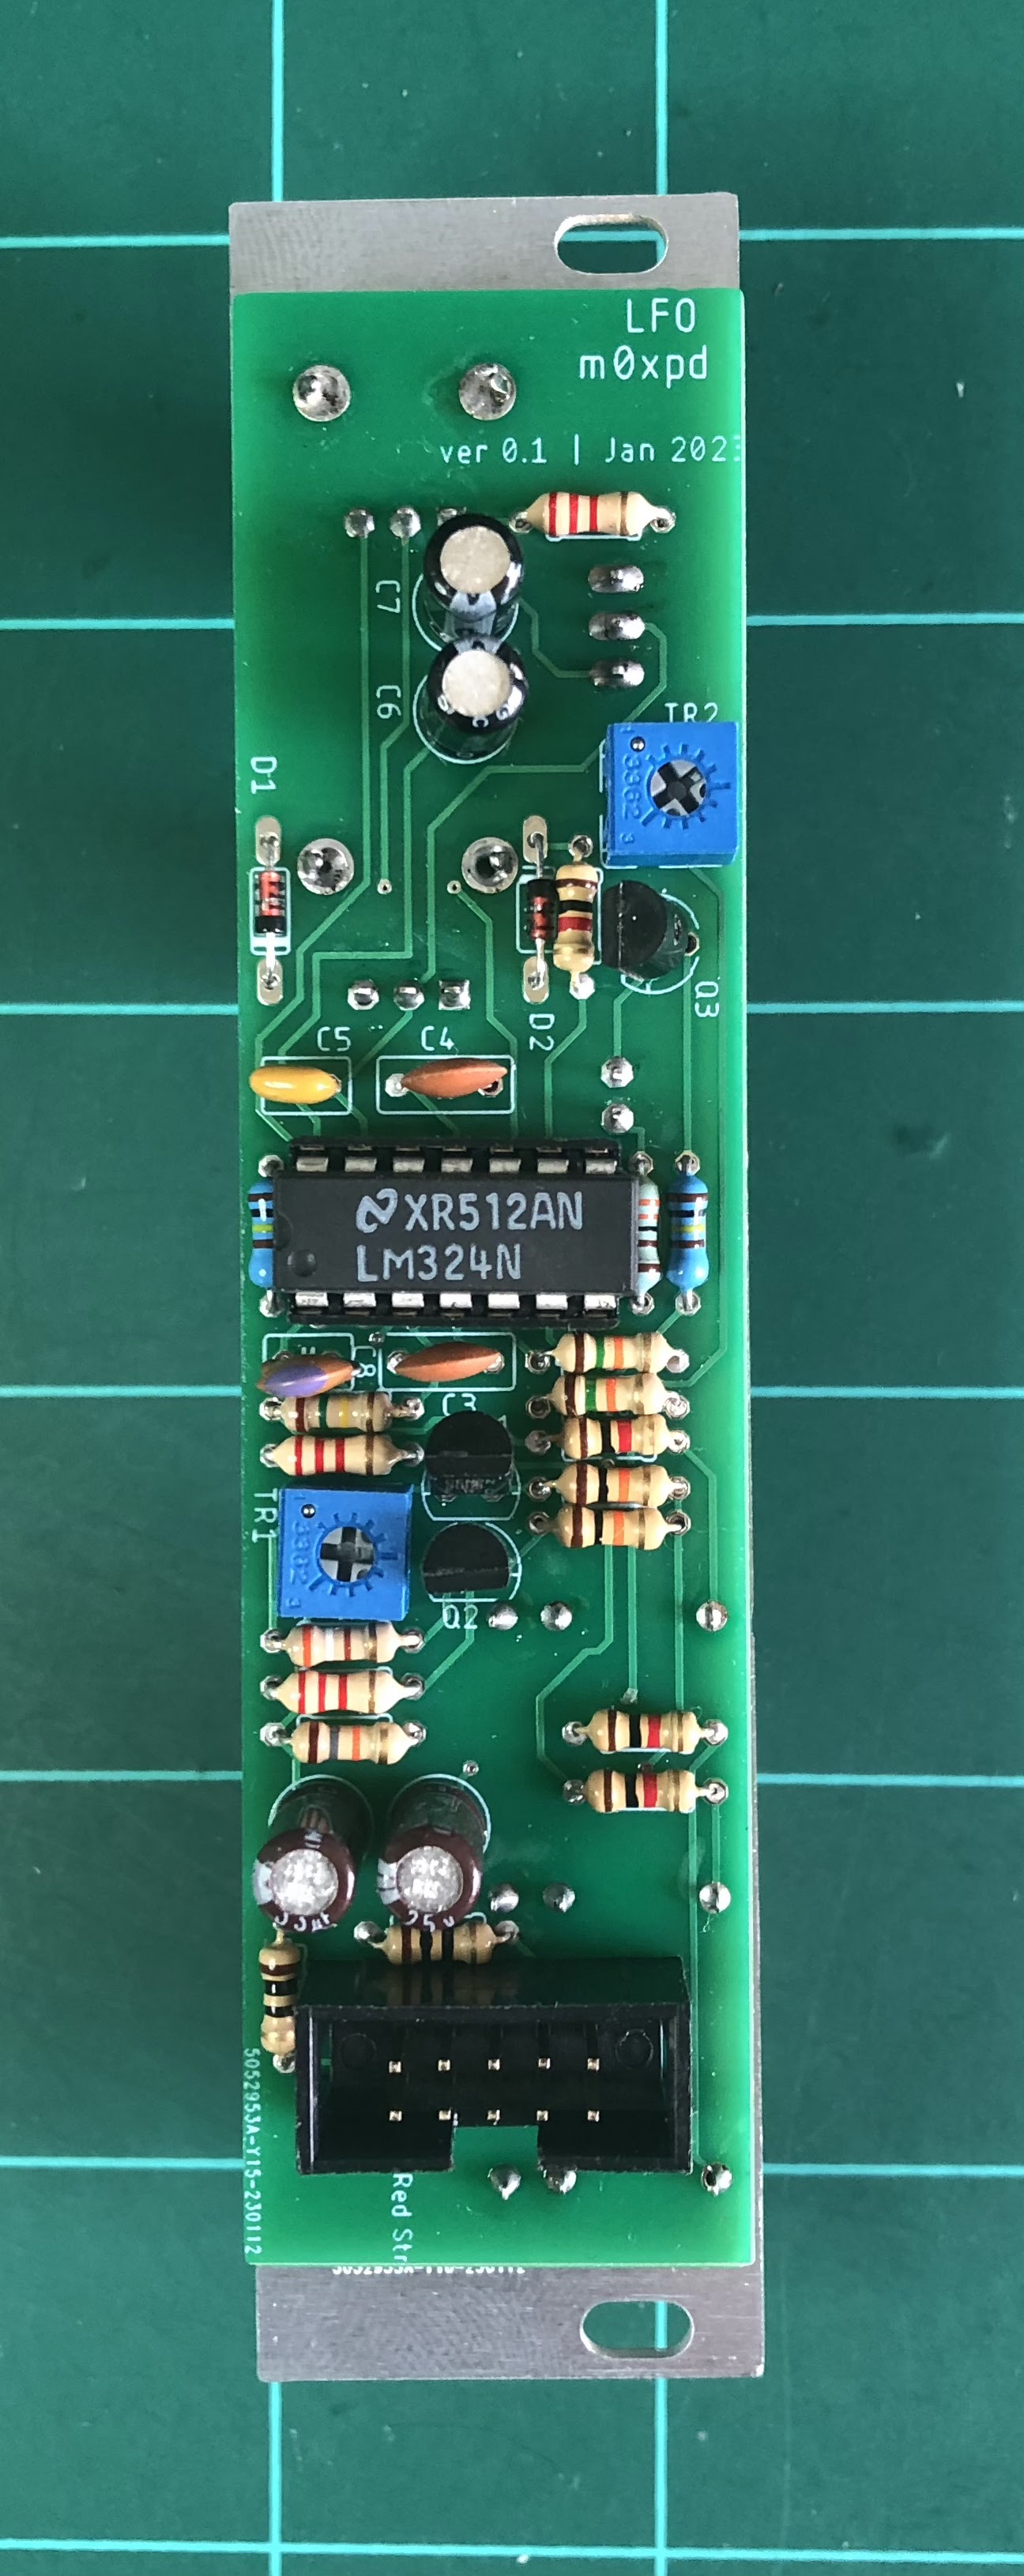
The second of my Eddy-inspired new builds is a Low Frequency Oscillator.
My first LFO goes right back to
the start of my synth adventure. It is a design by the late, great Ray Wilson, whose website '
Music From Outer Space' (MFOS) has been left up as a tribute to Ray's creativity and as a wonderful resource. My original LFO offered two oscillators with square or ramp outputs.
When I decided (in January this year) to build a new LFO, I looked again at Eddy's site. Sure enough, there was a suggestion there for
an LFO with 'variable skew' designed by Ken Stone. I was attracted by Eddy's words:
"A simple LFO with pulsewave (with variable pulse width) and a seamless transition between a Ramp wave, Triangle wave and Sawtooth wave using one potmeter. With LED rate indicators and Speed and Shape controls."
However, I couldn't help remembering something similar on the MFOS site.
I wanted a 'sinewave' output, because I like the idea of modulation sources without discontinuities (like the step-wise discontinuities in the squarewaves or the gradient discontinuities in the ramp, neither of which are really what we want when we're trying to make "whoosing" or "swirling" effects...).
I decided to go with something closer to the MFOS design but, as a fully signed up cheapskate, I resented the idea of 'wasting' an LM13700 on the task of triangle to sinewave conversion, even though I have an embarrassing number of 13700s in 'stores'. Instead, I used the old differential pair ploy, now widely associated with Thomas Henry, familiar to readers of Eddy's site.
Here's my schematic:
Here's one of my new LFOs, seen from all important angles:
Once again, there's not a wire in sight. Oh and yes - you do see an LM324 there. I'm starting a one-man crusade against the indiscriminate use of TL074s everywhere. There are simpler alternatives which should be used, especially when the price of semiconductors (and everything else) is so crazy! I even got a bunch of TL084s (at a good price) and intend to remind the world that there may be times when we need the JFET input impedance, but don't need the last scintilla the TL07x offers over the TL08x. Perhaps I shouldn't say that in case it pushes up the price of TL084s!
Of course, the 'sinewave' is only a (poor man's approximation to a) sinewave when the shape control is centralised; at either extreme of travel the 'sine' output approaches what might best be described as a train of sigmoid functions, which is why I labelled the output "Curve" on the front panel.
Needless to say (again) everything works fine and it is a joy to have too many LFOs, rather than too few.
So - here are two modules, built according to my new design practice, standing on the shoulders of the original design work of Yves Usson and Ray Wilson and motivated (at least in part) by the words of blogger and inspiration Eddy Bergman.
73,
m0xpd


No comments:
Post a Comment