Here's the story of a notorious late adopter's first foray into the world of Arduino.
As a long-term PIC advocate, I've been generally disinterested in matters Atmel and particularly put off by the statement that Arduino is intended for a bunch of wierdos (sorry - that should read "is intended for artists, designers, hobbyists, and anyone interested in creating interactive objects or environments"). However, things have changed...
I guess it started when I looked at Ron, NR8O's use of an Arduino to drive the eBay AD9850 DDS module. The Arduino looked pretty neat in that application - and you program it in a real programming language! Then I read Limor Fried's comparison between Microchip and AVR microcontrollers. Interesting. Given the enjoyment I'd had with my new Raspberry Pi (Blogs Passim), I thought perhaps it was time for me to join hands with all those liberals who have sewn Arduinos into their gaily coloured clothing.
Of course, that wasn't going to see me exchange my shekels with an authorised Arduino shop - particularly as I'd noticed that you can buy a kit of components for an Arduino clone for pennies on eBay. I got me a kit and started to think about how I could put it together on something more permanent than a solder-less breadboard.
Credit where credit's due - Arduino does publish a homebrew design for cheapskates like me on the Arduino pages but that didn't float my boat. So, after some searching around, I found Johan von Konow's design for a DIY Arduino - the Nanino.
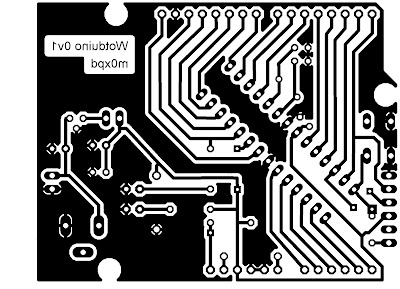
Johan publishes a copper pattern for the Nanino, but I wanted to have the flexibility to change things - so I brewed up my own design in Eagle.
Update (28/09/2013): these Eagle files are now available for free download - see the link in my comment below.
Here's my (current) copper pattern (seen from the component side)...
and here's the first board...
You can see the Nanino's influence in positioning the chip at a jaunty 45 degree angle!
I used Limor's (/LadyAda's) excellent Arduino resources within her extensive Eagle Library to simplify the design of the board, with its standardized profile and connector positions.
The board is programmed via a USB to serial adapter which implements a Virtual COM Port. You need to connect to the DTR ("Data Terminal Ready") pin on the adapter to access the "auto reset" functionality in uploading "sketches" to the board - otherwise you're into all sorts of nonsense about manually pressing the reset button. Don't be fooled by the RTS pin - this means "Ready to Send" in the language of UARTs and isn't a misprinted abbreviation of Reset.
You can see the adapter (and the connection to the DTR pin) here...
If you are wise enough buy your Arduino kit from 4Tronix, the USB adapter arrives already modified so as to bring the DTR line to the header plug that connects directly to my board's serial programming port, saving you from the messy hook-up in the photo above. Beauty!
I call my new board WOTDUINO (pronounced "What do I know"), making it particularly suitable for people with little confidence and low self-esteem. It is also possible to build a similar version (pronounced "What do WE know"), which is suitable for groups of people who don't think they measure up HI HI.
Now let's see what it can do.
...-.- de m0xpd
Subscribe to:
Post Comments (Atom)


Great Work :P
ReplyDeleteWould you share the Eagle files please?
Cheers
Rupert
Thanks, Rupert.
DeleteI'm not ready to publish the Eagle files yet - but send me an email address and I'll drop you a copy...
"shack dot nasties at gee male dot com"
m0xpd
Great name!
ReplyDeleteExcellent work and good blog. How are you making your PCBS? They look home etched...Cheers!
ReplyDeleteYes - they're home-brewed.
DeleteLatest description of my process here:
http://m0xpd.blogspot.co.uk/2012/03/volte-face-on-toner-transfer.html
m0xpd
thanks m0xpd great jobs
ReplyDeleteAs the Wotduino features in the rig associated with my SPRAT article "Occam's Microcontroller", the design files are now available here.
ReplyDelete