Having saluted China's achievements in space exploration it is only fair that we should also recognize another nation's entry into the elite club...
India today successfully placed an object into orbit around Mars - here's a graphic from the front page of the rightly proud Indian Space Research Organisation...
There is something extra-special about inter-planetary exploration that commands additional kudos.
Now we've demonstrated an inter-planetary capacity, perhaps we can inspire solutions to problems within arm's reach.
Well done India - hats off to you!
...-.- de m0xpd
Wednesday 24 September 2014
Saturday 6 September 2014
Automated IF Filter Measurement
Readers will have seen how I have used an Arduino to generate sweeps of the Intermediate Frequency of a receiver, allowing me to visualize the response of a crystal filter in situ. Well now - with the recent work on peak voltage detection associated with the "Power" meter - I've found myself in a position to automate more of the process...
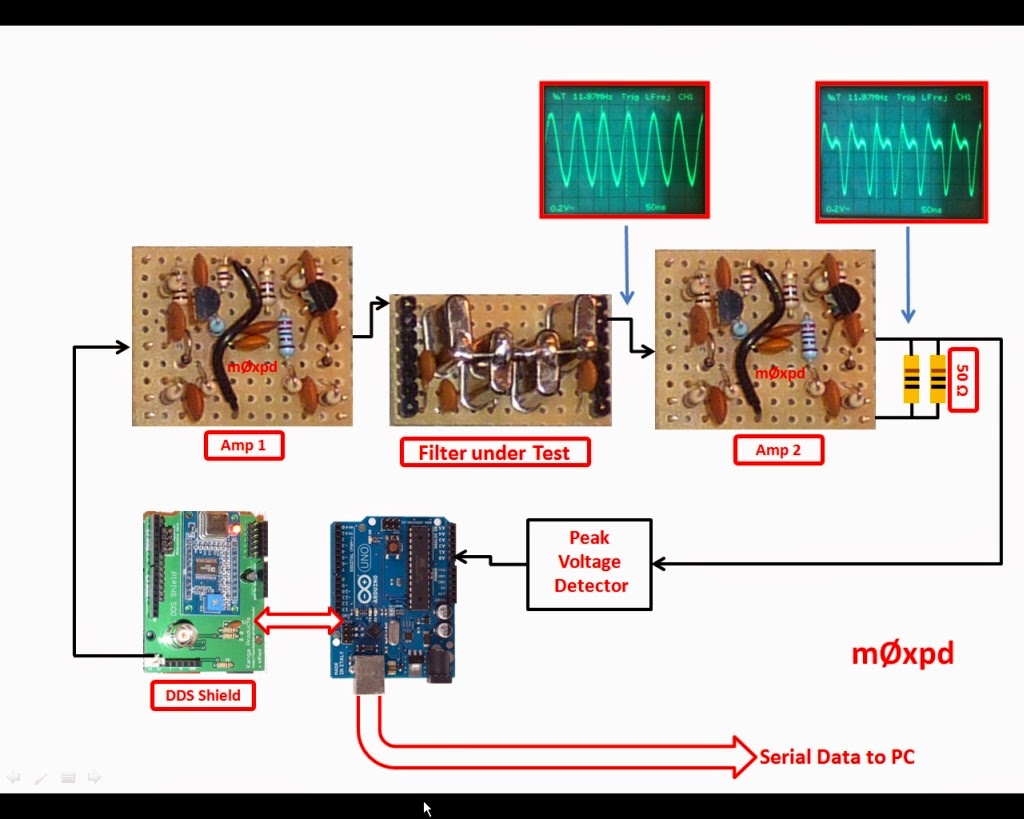
An m0xpd DDS shield generates a sweep of the IF range of interest, in controllable frequency increments (currently I'm using 50 Hz steps). Its output is fed to a broadband amplifier (actually one of the plug-in BITX amplifiers), which drives the crystal IF filter under test (in this case, it is the little 12 MHz plug-in module described previously). The output of the filter is fed to a second amplifier, which is terminated by 50 Ohms.
The voltage developed over the 50 Ohm termination (actually realised by my here rather over-specified new dummy load) is sensed by my "power meter". The result is sent by serial link to a PC, for each frequency measured in the sweep. The results are sent in tab-delimited form, with the frequency sent first, then the peak voltage measured at that frequency (represented by the ADC code - although any other format is possible - and easy!).
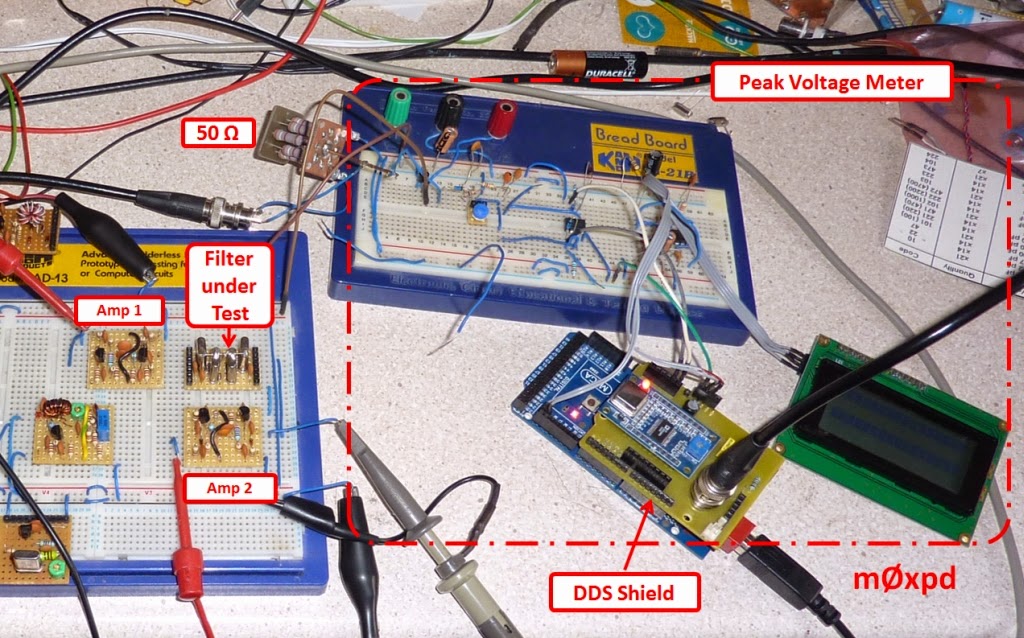
Here's the whole shooting match in the flesh...
As you can see on the 'scope trace in the top right hand corner of the image right at the top of this post, the output of the second BITX amplifier is actually pushed into asymmetric non-linearity at this signal level, with its negative peak level significantly larger in magnitude than its positive.
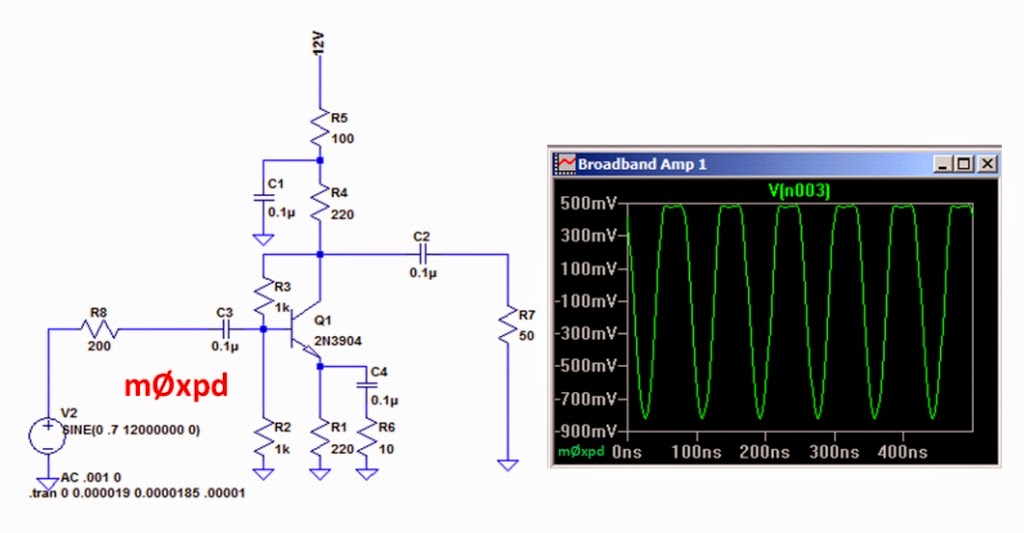
This is exactly what's expected of this simple amplifier, as confirmed by this little LT SPICE model...
Of course, as (bad) luck would have it, your humble servant's peak voltage meter reads the POSITIVE peak voltage - I was rather worried that I'd lost a lot of dynamic range and that the system wouldn't work - but I pressed on...
The serial data from the Arduino can be read into any terminal program (PuTTY, Realterm, etc) - but I used the Serial Monitor feature within the Arduino environment for simplicity.
Here you can see (an extract of) the data read into the Serial Monitor, which is then copied into Excel (or your favourite spreadheet) for plotting...
The ADC code is the raw number read from the analog to digital converter (proportional to the peak voltage), which I've converted first into voltage, then into dB re 1 V ("dBV").
A plot of the magnitude frequency response of the IF filter is easy to produce...
As a further test of the system's flexibility, I switched my attention to an 8MHz IF filter I'd been using previously for CW applications and plugged it into the "Filter under Test" position...
I changed the start and end points of the frequency sweep in my code and ran a new test...
I knew this was a nice, clean filter - but I didn't know quite how flat it was!
This test takes about ten seconds to run. With a prepared "template" in Excel, it takes about another 10 seconds to copy the data from the Serial Monitor window into Excel and produce the graph!
The bare bones of my code are seen below - they're quite enough to communicate (as "pseudo-code") the intention of what I'm doing to anybody who wants to follow.
The code runs a sweep of frequencies (variable f), starting at fStart and running to fEnd, with an increment fStep. There's a delay of T milliseconds between each increment (on top of all the other tasks). The code uses my DDS library (of course).
Measuring the IF response of my SSB rigs in situ is now easily done, in less than a minute.
...-.- de m0xpd
An m0xpd DDS shield generates a sweep of the IF range of interest, in controllable frequency increments (currently I'm using 50 Hz steps). Its output is fed to a broadband amplifier (actually one of the plug-in BITX amplifiers), which drives the crystal IF filter under test (in this case, it is the little 12 MHz plug-in module described previously). The output of the filter is fed to a second amplifier, which is terminated by 50 Ohms.
The immediate intention is that this copies the arrangement in the BITX receiver - as I want to be able to make in-situ measurements of the IF filter response in a BITX (for reasons that will become clear over the coming months). Surrounding the filter by the bi-directional amplifiers and the 50 Ohm termination (which copies the loading presented by the pi pad in front of the second mixer) matches the conditions in the BITX. Later, this might develop into a more general "test bed" for measurements on any crystal filter.
The voltage developed over the 50 Ohm termination (actually realised by my here rather over-specified new dummy load) is sensed by my "power meter". The result is sent by serial link to a PC, for each frequency measured in the sweep. The results are sent in tab-delimited form, with the frequency sent first, then the peak voltage measured at that frequency (represented by the ADC code - although any other format is possible - and easy!).
Here's the whole shooting match in the flesh...
As you can see on the 'scope trace in the top right hand corner of the image right at the top of this post, the output of the second BITX amplifier is actually pushed into asymmetric non-linearity at this signal level, with its negative peak level significantly larger in magnitude than its positive.
This is exactly what's expected of this simple amplifier, as confirmed by this little LT SPICE model...
Of course, as (bad) luck would have it, your humble servant's peak voltage meter reads the POSITIVE peak voltage - I was rather worried that I'd lost a lot of dynamic range and that the system wouldn't work - but I pressed on...
The serial data from the Arduino can be read into any terminal program (PuTTY, Realterm, etc) - but I used the Serial Monitor feature within the Arduino environment for simplicity.
Here you can see (an extract of) the data read into the Serial Monitor, which is then copied into Excel (or your favourite spreadheet) for plotting...
The ADC code is the raw number read from the analog to digital converter (proportional to the peak voltage), which I've converted first into voltage, then into dB re 1 V ("dBV").
A plot of the magnitude frequency response of the IF filter is easy to produce...
As a further test of the system's flexibility, I switched my attention to an 8MHz IF filter I'd been using previously for CW applications and plugged it into the "Filter under Test" position...
I changed the start and end points of the frequency sweep in my code and ran a new test...
I knew this was a nice, clean filter - but I didn't know quite how flat it was!
This test takes about ten seconds to run. With a prepared "template" in Excel, it takes about another 10 seconds to copy the data from the Serial Monitor window into Excel and produce the graph!
The bare bones of my code are seen below - they're quite enough to communicate (as "pseudo-code") the intention of what I'm doing to anybody who wants to follow.
The code runs a sweep of frequencies (variable f), starting at fStart and running to fEnd, with an increment fStep. There's a delay of T milliseconds between each increment (on top of all the other tasks). The code uses my DDS library (of course).
Measuring the IF response of my SSB rigs in situ is now easily done, in less than a minute.
...-.- de m0xpd
Subscribe to:
Posts (Atom)


